tirsdag 18. august 2015

12 Tags of 2015 -TimHoltz- August

Tim kom med en tøff tag denne måneden, jeg har ikke alt han bruker som vanlig så jeg tyr til andre midler. Men her var ikke tagen så utrolig vanskelig, den var en av de enkleste og kuleste.
Måtte jo såklart kjøpe diesen han bruker her, den er bare så fantastisk !
Her er min tag for August :) 

Tim came with a tough tag this month, since I as always misses a few things that he uses I just simply use my own imagination. This tag wasn't so hard to make, it was the easiest and coolest tags.
I had to buy myself that dies he uses, it was so faboulous !
Here's my tag for August :)

Supplies used;
Surfaces; ManilaTag#8, paper stash/post
Stamps; TH text, TH train
Dies; Adventure words/block,cuttlebug,magnetic platform, plates
Emblishments; adornment steampunkclock, two metall flowers, love pin, remnant rubs
Distress ink; walnut stain, peacock feathers, black soot, mustard seed, spiced marmelade, picked raspberry
Distress marker; black soot
Ink; archival jet black, alcohol ink/mushroom
Tools; paint brush, heat tool, scissors, sanding grip, rub tool, tiny attacher, akryllic block
Adhesive; Glue N'Seal Matte
Mediums; gesso
Misc; string-removable tape

The first manila tag, I used the dies on

Second manila tag I use paper stash and glue on with glue n seal.

Cut the edges with scissors and make a hole in the top

Glue the first manila tag on top of the second using glue n seal

Put on gesso over the tag, make sure to have paper around to dry off gesso from the die cut holes

When the gesso is dry, you can paint the tag with distress inkers

This is how it looks after using the distress inkers on

Then I put on glue n seal over and blended the colors, like this

I stamped a TH train on paper and cut it out

Glue it on the tag and put on a picture over it

My first attempt with rub on, with rub on tools

Use your tiny attacher and attach the rub on to the top of the tag

This is stickers with flowers, I put on some alcohol ink/mushroom

A cotton stick to rub the ink over the stickers in a thinner layer

Here I stamped on some text from TH's stamp pack with cool cars, on the left side

And voila, here's the tag finished with emblishments and everything.

Pin it to remember it :) 


onsdag 15. juli 2015

12 Tags of 2015 -TimHoltz- July

Hi there !
So this is my July tag from Tim Holtz blog, I have a problem without a singer sewing machine so I simply have to do it the old fashioned way.. It's not that pretty but hey, I tried right?! ;) 

Supplies used: 
- manilatag #8 
- TH paper -baking paper
- stamps from Europris and stamp birdhouse from diecuts
- emblishments: No5, loop pin and bearemblishment
- distress markers: mustard seed, Stormy sky, Fired brick and Peeled paint
- Jet black archival ink
- acryl block
- Distress ink; vintage photo
- Needle and black thread
- ribbon vanilla 
- Water sprayer
- Glue N Seal Matte
- sticker; camera stamp

Here's my Tag !

On the top it's the ribbon that I painted with distress markers, the loop pin with bearemblishment

The middle with my neautiful stamps. The bird house comes actually with a die but I didn't use it cause it took so much space on the card..

At the bottom there is No 5 emblishment with a cute camera sticker on.


And here's the Tag ! Pin it to remember it ;) 


torsdag 9. juli 2015

Andre eksplosjonsboks

Laget eksplosjonsboks tidligere, men lik så greit å vise frem denne her også.
Den er til min kjære arbeidskollega, medarbeider og en veldig god venn.
Fyllte selvsagt også denne opp med godis:)

Slik ser den ut når jeg har knytt den sammen.

Lokket uten båndet rundt, uglene har "levende" øyne, kjempe kult.
Uglene er stemplet med archival black, clear stamp pulver og beukt varmepistol på så de skinner så flott i lyset ! Både uglene og øynene til uglene er kjøpt i USA :)

Innsiden som er fyllt opp til randen med godis :)
Legg gjerne igjen en kommenatr :D


Eske med Hyller

Da har jeg prøvd ut noe helt nytt, jeg prøvde meg på en boks med hyller inni ! 
Først måtte jeg følge malen til punkt og prikke, deretter finne frem ting jeg ville dekorere selve boksen med utvendig. Syns selv det ble ganske bra til å være mitt første, dette laget jeg til en kollega på skolen jeg er renholder på. Hun er sekretæren, fått veldig god kontakt, slik en trivelig og flott dame.
Så jeg syntes hun fortjener noe ekstra godt til Sommeren :)
Her er kortet ihvertfall !

Her har jeg laget ferdig kortet innvendig etter malen, hyllene var vanskelige men fikk det til tilslutt.

Laget en Tag som "kort" til boksen.


Dieset ut fra Magnolias Doohickey volume 3 dies, LoveBirds

Dieset ut en blomst jeg fant liggende i artbin min, veldig fin, skjønner ikke hvorfor jeg ikke har brukt den tidligere, litt tynn i stilkene så er nok derfor.

Diesen her vises ikke så veldig, men er fra Magnolias Doohickey volume 3, BirdCage.

Toppen av lokket pyntet jeg med en blomst, denne er stemplet med archival black, drysset over med clear stamps powder og brukte varmepistolen på slik at det smeltet sammen. Farget med distress.

Innsiden, fyllt opp hyllene med godis, hårspenner og hårstrikk.

Dette var en ny erfaring, håper på å lage enda flere kule ting !
Gjerne kommenter :) 


søndag 21. juni 2015

12 Tags of 2015 - TimHoltz- June

Hehey people !
Just made it through with my June tag ! That was awesome. Offcourse I've missed a couple of things in this tag cause I haven't all the things Tims got. So I used my imagination and created what I could make out of what I have :D 
Hope you'll like my tag for June !

Supplies I used: 
- Surfaces: #8 manila tag, burlap, plastic packaging,akvarell paper, brown paper
- Layering stencil: THS016 Harlequin
- stamps: hashtag norwegian
- embellishments: diamond heart, linen ribbon, jute string, loop pins, typed token, straw
- distress ink pad: DIY distress it yourself, walnut stain, peacock feathers
- distress re-inkers: mowed lawn, pine needles, peeled paint
- distress spray stain: picket fence
- alcohol ink: mushroom
- tools: scissors, mini ink blending tool, craft scraper, heat tool, ruler, pencil, staz on
-adhesive: wonder tape and scotch glue

First I inked the distress it yourself pad with my three re-inkers, scraped it into the pad


And then I dipped the front on the stamp to show the colors on the outside

I forgot to take a picture, but I stamped this stencil with the distress it yourself pad and putted on the card.
I also forgot to take a picture of coloring the surface of the manila tag, but I just put a picture here of the manila tag so you can see.

Like this, this is how it turned out after putting the stencil over with the distress it yourself pad.

Then I used the craft scraper on the edges of the tag

And inked the edges with my walnut stain mini distresser


I used staz on jet black on the Hashtag #smakepå (#tasteit) on a brown paper

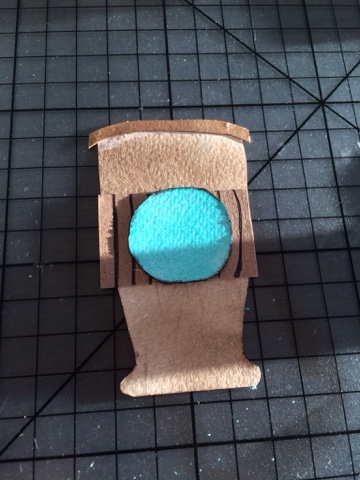
Since I don't have the starbucks coffee dies, I simply had to use the old fashioned way and cut it out, here I used a ruler, scissors and my pencil.

Making the middle of the cup with my pencil and a piece of brown paper

Here I make the round paper dot using my mini distress stamper as a round thing.

Coloring it with my mini distress Peacock feathers

There you go, almost like a coffee cup, I think it turned out ok since I don't have the dies.. 

Using some adhesive tape on the backside, also take the straw on the backside 

Here I putted on picket fence color on a plastic piece to be the top of the cup

Glued on the burlap at the bottom, glued on the hashtag and stitched it up together


On the diamond heart embellisment I used some alcohol ink mushroom to bring the great figures.

Pin it to remember it, as Tim always says ! This is my ending result ! 
Thank you for looking, and also thanks for a comment or two :) 


søndag 24. mai 2015

12 Tags of 2015 - TimHoltz - May

Juhuu, da har jeg hatt en skikkelig god ferie i London !!
Deilig å være tilbake å starte på scrappingen, klødde skikkelig i henda da jeg fikk se utfordringen inne på bloggen til Tim Holtz 1 Mai.
Har besøkt Big Ben, Buckingham Palace, Tower Bridge, Tower of London, London Eye, Westminister Abbey, Oxford Street, British Museum, Madame Tussauds, Baker Street, St James Park, London Zoo og Blade Rubber Stamp scrappebutikk *gliser* 
Her er mitt bidrag til denne månedens utfordring !

Hellow, now I'm back home from a fantastic vacation in London !!
Wonderful to be home again with such good memories from this trip, but I feel somethings been missing and that's making this months tag, wich he actually posted on his blog 1th of May.
I've been visiting (look on norwegian, big ben aso...) Blade rubber stamps *smiling*
This is my Tag of this month ! 

Supplies I've used; 
- Picture from google, home printed
- Distress Vintage photo, Scattered Straw, Peacock feathers, Black soot and Walnut stain
- Staz on jet black, acryllic block
- Stamps from TH
- Glue N Seal
- Different papers 
- "Strie" almost the same as the Burlap TH uses
- alphabetic stencil with palette knife
- Texture Paste
- Memo pin, Token with word and mini fastener
- Straw"ish" thread and cream ribbon
- Different flowers from my flower box with glue pistol
- Sand Paper fine
(I think that was it, but in case I forgot something it's probably in my pictures :)

1. I glued the "Strie" on my tag with glue n seal matte

So it looks like this after cutting the edges

2. Add some texture paste on the tag with the alphabetic stencil and palette knife

3. Distress the texture paste after drying with peacock feathers

4. Distress the edges of the tag with some Vintage photo

5. Cut out some different papers and distress them also with vintage photo

6. After gluing them on the tag, take some glue n seal matte over the papers

7. While the tag is drying, you can start by making the photo pretty for the tag.

8. Paint with distress colors on her shirt and also some yellow on the backround

9. Use your cotton stick to drag the colors over the picture and make them lighter

10. Use some sand paper to make the edges look older thank they actually are

11. Now your photo look abit older and are ready to be put on to the Tag

12. I just stamped up some words, dragged antique linen over the words and glued them on

13. Stamped on some stamps on the picture with staz on, staz on dries faster and holds better on glossy  papers or photos

14. Here I forgot to take a photo, but I colored the ribbon with vintage photo and walnut stain, sprayed on some water and crunched it together. Squeezed out the water and now drying it

15. Using my heating tool, drying the ribbon will go faster

16. So this is how it looks like when it's completly dry, pretty huh? 

17. Tie the ribbon around the card and make a pretty loop

18. Using the memo pin with token and a mini fastener, I simply attach the photo into the ribbon, whithout using any glue. And I hang up two buttons with another pin with a bow on under the loop of the ribbon.

19. Since I don't have any dies to make flowers with, I had to use some of my own flowers

20. By using black soot distress with water, I can make "drops" on my tag

21. And yes offcourse, I don't have any spritzer so I have to make this black soot water "dot" so I can simply use my blue "spritzer" (as I call it cause I don't have anything else) to make drops

22. making drops on my tag, the last finish !!!!

23. The tag is finished, what you think? Pretty cool !

24. A great ending result, so this is my Tag for May.
Feel free to give me some comments, and Thank You :-)